To get started you will need to set up your development environment. I won’t go into details on how to set it up, but instead I will share useful links to other websites that explain this process.
nFringe by Pixel Mine is a great tool to use with Visual Studio. You can find a simple set up guide here.
When you have the tools installed you can follow this guide to configure the development environment.
Now it is time to finally create the first UnrealScript class and look closer at what it is made of. In UnrealScript you can only have one class definition in a file. Let’s create a file called HealthFountain.uc and add the following code to it:
class HealthFountain extends Actor;

DefaultProperties
{
}
This is a very basic class definition. At this point the HealthFountain class does nothing more than the base Actor class from which it is derived. By extending the Actor class, the HealthFountain class has all the properties and functions of the Actor class. You can look into the Actor.uc file to see all the code in the Actor class.
Notice the DefaultProperties block that follows class declaration. In this block you can initialise class variables to their default values and add Actor components.
Let’s add more code to the HealthFountain class and make the actor visible in the level.
class HealthFountain extends Actor
      ClassGroup(Custom)
      placeable;

/** Health points stored by this instance */
var()  int  HealthPoints;

/** How much health points are regenerated */
var()  int  HealingAmount;

DefaultProperties
{
    Begin Object Class=StaticMeshComponent Name=BaseMesh
        StaticMesh=StaticMesh'Pickups.Base_Powerup.Mesh.S_Pickups_Base_Powerup01'
    End Object
    Components.Add(BaseMesh)

    HealthPoints=100

    HealingAmount=5
}
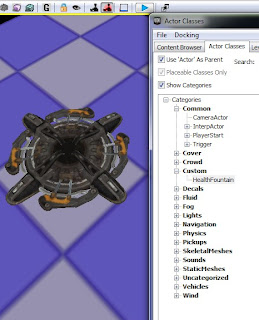
The keyword placeable allows the class instance to be placed in the level by the level designer. The ClassGroup allows to specify the category in which this actor will be listed in the Actor Classes window of the Generic Browser. If we don’t specify that, the actor will be listed as Uncategorized. We can use the keyword notplaceable when we want to disable actor placement in the level. For example think of a base actor AmmoPickup that would not be placeable, but its more specific subclasses like PistolAmmoPickup or RifleAmmoPickup would be placeable.

You will notice that we also added some variables to the class. In UnrealScript there are two kinds of variables and they have some specific rules to follow when using them.
Instance variables (keyword var) are the variables specific to a class instance. They must be declared right after class declaration or within struct declarations.
Local variables (keyword local) are used within functions and they are only active while that function is executing. They must be declared as soon as the function code starts. Also they cannot be initialised in the same line as their declaration. An example of that will be shown in later posts.
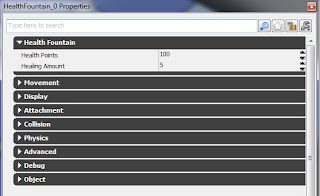
Instance variables can also be exposed in Unreal Editor when we use var() keyword. So in the case of HealthFountain class above, the level designer will be able to change two integer values called HealthPoints and HealingAmount when they open the actor properties window (F4 in the editor).

Next we have some more code in the DefaultProperties block. First thing that happens in the DefaultProperties block is a creation of a StaticMeshComponent (one of many types of Actor components, more on that at UDN). The new StaticMeshComponent is told to use the StaticMesh'Pickups.Base_Powerup.Mesh.S_Pickups_Base_Powerup01' pickup base as a static mesh. Notice the way you need to specify the full package and asset name. When the component is created, we then add it to the actor component array of our actor.
After that we set the HealthPoints and HealingAmount to default values. This will mean that each time an instance of this actor is placed the level, it will have those values as default. These values can be changed by level designer, because we exposed them in the editor by using var() keyword.
At this point the HealthFountain actor has its most basic code done. It appears in the Actor Classes window of the Generic Browser and can be placed in the level. Right now it only looks like a static mesh, and of course does not have any of the features discussed previously. We will add more Actor components and functionality to our custom actor in the next post.
No comments:
Post a Comment