Showing posts with label udk. Show all posts

Sunday, 8 May 2011

Creating a custom actor part 4/4

Now that we know how to add various Actor components to a custom actor class, we are going to add functionality to the HealthFountain class making it behave in the following way:

  • When the player is away from it, the actor is idle and emits a number of particles based on the amount of health points it currently holds.

  • When the player enters it, the actor starts regenerating player’s health every second.

  • Each time player’s health is increased, the actor’s amount of health points is decreased. Each time the actor’s health points amount is decreased, fewer particles are emitted. Each time this regeneration process takes place a sound indicating player’s health increase is played to provide feedback.

  • When the player reaches their maximum health or steps away from the actor, the regeneration process is ended and the actor goes back to being idle.

  • When the actor’s health points amount reaches 0 the actor becomes empty and can no longer regenerate player’s health. This will happen unless the level designer decides to make a specific instance of this class a never ending source of health points, so we need to provide the level designer with some form of control to do that.


This fairly simple behaviour can be easily set up in UnrealScript using States, Functions and Events. If you are new to these programming concepts or if you want to see how they are used in UnrealScript I recommend reading this and this UDN documents.

Before we move to discussing states specific to our actor we need to add three more variables to the existing class.


var int MaxHealthPoints;
var() bool bCanGoEmpty;
var SoundCue HealingSound;


The integer variable MaxHealthPoints will store the maximum amount of health points. The Boolean variable will be used to determine if the HealthFountain can run out of health points. As you can see the var() makes it exposed in the editor so that it can be changed for a specific instance of the class if the level designer wishes so. The SoundCue variable will allow us to play a sound indicating healing process. Let’s initialise two of these variables in the DefaultProperties block:


HealingSound=SoundCue'A_Pickups.Health.Cue.A_Pickups_Health_Small_Cue_Modulated'

bCanGoEmpty=true


So by default each HealthFountain will be set to run out of health points and it will play a sound of a UT3 Health Vial pickup when player’s health will increase. We will initialise the MaxHealthPoints later in a different way, outside of DefaultProperties block.

Using state programming allows us to break the overall functionality into logical pieces. So for example in case of our actor we want the actor to behave differently when it is idle, when it is healing the player and when it is empty. We will therefore need three states:

  1. Idle

  2. Healing

  3. Empty


By separating the behaviour into these three states, we can create functions that will only exist within a specific state. For example the healing function should only exist and be executed if the actor is in Healing state. What is more you can have the same function exist in all the states, but actually do something completely different depending on the state the actor is in. Finally you can have states ignore functions and events altogether (there is even an ignores keyword for that). In case of our HealthFountain we will see that no code will be executed when it goes into Empty state.

So let’s add states to our class. Between the instance variables and DefaultProperties add the following code:


auto state Idle
{
}

state Healing
{
}

state Empty
{
}


This is the basic state definition and the keyword auto means that this will be the default state the actor is in when added to the level. Now that we have the states in place, we need to react to things happening to our actor. We can do that by using events. Think of events as special kind of functions happening in the level when the game starts and when various actors interact with each other. In UnrealScript the keyword event has the same meaning as keyword function, but functions with the event keyword can also be called from native code. I’ll be using the keyword event for the actual events that happen in the level during play and the keyword function to declare our own functions. For the purpose of our HealthFountain we will need the following four events:

  • event PostBeginPlay() – this is called when the level is loaded and immediately after play begins.

  • event Touch(Actor Other, PrimitiveComponent OtherComp, vector HitLocation, vector HitNormal) – this is called when an actory is colliding with another actor

  • event UnTouch(Actor Other) – this is called when the touching of two actors ends


Add the PostBeginPlay event code after the declaration of instance variables:


event PostBeginPlay()
{
Super.PostBeginPlay();

MaxHealthPoints = HealthPoints;

ParticleEffect.SetFloatParameter('SpawnRateParameter', Float(HealthPoints) / Float(MaxHealthPoints));
}


As you can figure out from above code, when the level starts and the PostBeginPlay is called, we will call the PostBeginPlay of the parent class, and then we will initialise MaxHealthPoints with the value from HealthPoints. Finally we pass a value into the SpawnRateParameter of the ParticleSystemComponent we created earlier, a float value that comes from dividing current HealthPoint by MaxHealthPoints. It will be 1.0 when the level starts and HealthFountain is still full of health points.

Next let’s look at what happens to the actor when it is in the Idle state. Being in Idle state for our actor means that it waits for collision with the player, and once this happens, it then goes into the Healing state. Instead of regularly checking if a collision with player has occurred we simply use the Touch event in the Idle state definition:


auto state Idle
{
event Touch(Actor Other, PrimitiveComponent OtherComp, vector HitLocation, vector HitNormal)
{
if (UTPawn(Other) != None && UTPawn(Other).Controller.bIsPlayer && UTPawn(Other).Health < UTPawn(Other).SuperHealthMax)
{
GoToState('Healing');
}
}
}


This code will check if the colliding actor is a player (UTPawn and UTPawn.Controller.bIsPlayer). We wouldn’t want the HealthFountain to go into HealingState when colliding with a projectile actor would we? We also need to check if the player’s health is lower than the maximum health (SuperHealthMax for UTPawn which is 199 points). If that is true, then the actor will then be moved into the Healing state by calling the function:


GoToState('Healing');


So now that the actor is in Healing state we finally need to code the function responsible for restoring player’s health. Add the following function to the Healing state:


function Heal()
{
local UTPawn P;

if (HealthPoints > 0)
{
foreach self.TouchingActors(class'UTPawn', P)
{
//heal the pawn only when it's health is lower than it's max
if (P.Health < P.SuperHealthMax)
{
P.Health = Min(P.Health + HealingAmount, P.SuperHealthMax);

PlaySound(HealingSound);

if (bCanGoEmpty)
{
HealthPoints = Max(HealthPoints - HealingAmount, 0);

ParticleEffect.SetFloatParameter('SpawnRateParameter', Float(HealthPoints) / Float(MaxHealthPoints));
}
}
else
{
GoToState('Idle');
}
}
}
else if (HealthPoints == 0)
{
GoToState('Empty');
}
}


In the Heal function we first create a local UTPawn variable called P. We will need this to get access the UTPawn object colliding with our actor (that UTPawn is of course the player). Remember that all local variables need to be declared at the start of the function, otherwise you will get an error when compiling the scripts.

We then check if the HealthFountain has any more health points left (HealthPoints > 0). If no, we need to move it into the Empty state. If yes, we need to find all actors currently colliding with the HealthFountain. We do this by using foreach iteration. What would look like this in C# for example:


foreach (UTPawn P in this.TouchingActors)
{
}


Is written like this in UnrealScript:


foreach self.TouchingActors(class'UTPawn', P)
{
}


This allows us to iterate through all UTPawns currently touching our actor. Once we get the UTPawn touching our actor we need to check if that UTPawn’s Health is not at maxium. If it is, we need to stop regeneration process and move our actor back to Idle state. Otherwise, we heal the UTPawn by adding HealingAmount to its Health (making sure it does not go above the SuperHealthMax). And we play the HealingSound SoundCue. Last thing we need to make sure is that the HealthFountain gets its health points decreased and the SpawnRateParameter is updated in the particle system. We do that of course if we decide that our actor can go empty. That covers the Heal function for our actor.

We also need to add an UnTouch event, which will transition our actor back to Idle state in case the player will step out the HealthFountain radius.


event UnTouch(Actor Other)
{
if (UTPawn(Other) != None && UTPawn(Other).Controller.bIsPlayer)
{
GoToState('Idle');
}
}


Again we need to make sure that it is the player who is the instigator of this UnTouch event. Otherwise the Healing state could end when the player fires a weapon at our actor, which is undesirable.

One last thing left to add to the Healing state is the actual state code. After all we need to somehow call the Heal function when the Healing state begins. State code together with functions makes up the state. Stated code however is not located in any function, it just sits within the state itself and usually starts with the Begin label like this:


Begin:

//call the heal function first time this state is started
Heal();

//call the Heal function every second
SetTimer(1.0, true, 'Heal');


So when Healing state begins, the code after the Begin label will be executed. Heal function will be called once and then a timer will be set to call the Heal function in a loop ever second the actor is in the Healing state.

For the Empty state, we leave it blank as we don’t want any functionality in that state. When in Empty state our actor should act as if it is switched off.

This makes the HealthFountain functionality complete and as originally outlined in part 1. Once again let’s look at the video to get an idea how the actor works when placed in the level.


Below is the entire HealthFountain.uc class code:


class HealthFountain extends Actor
ClassGroup(Custom)
placeable;

/** Health points stored by this instance */
var() int HealthPoints;

var int MaxHealthPoints;

/** How much health points are regenerated */
var() int HealingAmount;

/** Can the health points run out? */
var() bool bCanGoEmpty;

var ParticleSystemComponent ParticleEffect;

var SoundCue HealingSound;


event PostBeginPlay()
{
Super.PostBeginPlay();

MaxHealthPoints = HealthPoints;

ParticleEffect.SetFloatParameter('SpawnRateParameter', Float(HealthPoints) / Float(MaxHealthPoints));
}

auto state Idle
{
event Touch(Actor Other, PrimitiveComponent OtherComp, vector HitLocation, vector HitNormal)
{
if (UTPawn(Other) != None && UTPawn(Other).Controller.bIsPlayer && UTPawn(Other).Health < UTPawn(Other).SuperHealthMax)
{
GoToState('Healing');
}
}
}

state Healing
{
function Heal()
{
local UTPawn P;

if (HealthPoints > 0)
{
foreach self.TouchingActors(class'UTPawn', P)
{
//heal the pawn only when it's health is lower than it's max
if (P.Health < P.SuperHealthMax)
{
P.Health = Min(P.Health + HealingAmount, P.SuperHealthMax);

PlaySound(HealingSound);

if (bCanGoEmpty)
{
HealthPoints = Max(HealthPoints - HealingAmount, 0);

ParticleEffect.SetFloatParameter('SpawnRateParameter', Float(HealthPoints) / Float(MaxHealthPoints));
}
}
else
{
GoToState('Idle');
}
}
}
else if (HealthPoints == 0)
{
GoToState('Empty');
}
}

event UnTouch(Actor Other)
{
if (UTPawn(Other) != None && UTPawn(Other).Controller.bIsPlayer)
{
GoToState('Idle');
}
}

Begin:

//call the heal function first time this state is started
Heal();

//call the Heal function every second
SetTimer(1.0, true, 'Heal');
}

state Empty
{
}


DefaultProperties
{
Begin Object Class=DynamicLightEnvironmentComponent Name=HealthFountainLightEnvironment
bEnabled=true
bDynamic=false
bCastShadows=false
End Object
Components.Add(HealthFountainLightEnvironment)

Begin Object Class=CylinderComponent Name=CollisionCylinder
CollisionRadius=32.0
CollisionHeight=50.000000
CollideActors=true
End Object
Components.Add(CollisionCylinder)

CollisionComponent=CollisionCylinder
bCollideActors=true

Begin Object Class=StaticMeshComponent Name=BaseMesh
StaticMesh=StaticMesh'Pickups.Base_Powerup.Mesh.S_Pickups_Base_Powerup01'
CollideActors=false
Translation=(X=0.0, Y=0.0, Z=-50.0)
CastShadow=false
bCastDynamicShadow=false
bAcceptsLights=true
bForceDirectLightMap=true
LightingChannels=(BSP=true,Dynamic=false,Static=true,CompositeDynamic=true)
LightEnvironment=HealthFountainLightEnvironment
End Object
Components.Add(BaseMesh)

Begin Object Class=ParticleSystemComponent Name=ParticleSystemComponent0
Template=ParticleSystem'HealthFountain.Effects.P_HF_Whirl'
bAutoActivate=true
Translation=(X=0.0, Y=0.0, Z=-35.0)
End Object
ParticleEffect=ParticleSystemComponent0
Components.Add(ParticleSystemComponent0)

Begin Object Class=AudioComponent Name=AmbientSound
SoundCue=SoundCue'A_Gameplay.JumpPad.JumpPad_Ambient01Cue'
bAutoPlay=true
bUseOwnerLocation=true
bShouldRemainActiveIfDropped=true
bStopWhenOwnerDestroyed=true
End Object
Components.Add(AmbientSound)

HealingSound=SoundCue'A_Pickups.Health.Cue.A_Pickups_Health_Small_Cue_Modulated'

HealthPoints=100

HealingAmount=5

bCanGoEmpty=true
}

Friday, 6 May 2011

Creating a custom actor part 3/4

Now that the most basic foundations of the HealthFountain actor are coded, it is time to make our actor look like originally outlined in Part 1. Let’s start by adding more actor components. In the HealthFountain.uc file head over to the DefaultProperties block and add the following code:


Begin Object Class=DynamicLightEnvironmentComponent Name=HealthFountainLightEnvironment
bEnabled=true
bDynamic=false
bCastShadows=false
End Object
Components.Add(HealthFountainLightEnvironment)


DynamicLightEnvironmentComponent is used for lighting the static mesh we are using. We don’t need it to cast shadows because our static mesh is placed flat on the ground anyway, so we set bCastShadows to false. Next, let’s add collision component so that we can look for collisions with other actors during gameplay.


Begin Object Class=CylinderComponent Name=CollisionCylinder
CollisionRadius=32.0
CollisionHeight=50.000000
CollideActors=true
End Object
Components.Add(CollisionCylinder)
CollisionComponent=CollisionCylinder
bCollideActors=true


In the code above a CylinderComponent is created to serve as a primitive for collision for the actor. This defines a cylinder with 32 units radius and 100 units height (50 units in positive and negative Z). We then turn the collisions with other actors on by setting CollideActors in the CylinderComponent and bCollideActors in the actual HealthFountain actor to true. Notice that if you want to block actors when they collide with our actor, you would have to set bBlockActors to true. Because we want the player and weapon projectiles to pass through, we leave that turned off (which is the default setting).

Next, we need to take care of the StaticMeshComponent. We don’t need the mesh to collide with other actors. We do need to translate the mesh on Z axis though. Because we added the CollisionComponent by defining the CylinderComponent, the pivot point of our actor is placed in the middle of the collision cylinder, and not where the mesh pivot point was. We also assign the DynamicLightEnvironmentComponent we created to the LightEnvironment of the StaticMeshComponent, so that the static mesh can receive lighting.


Begin Object Class=StaticMeshComponent Name=BaseMesh
StaticMesh=StaticMesh'Pickups.Base_Powerup.Mesh.S_Pickups_Base_Powerup01'
CollideActors=false
Translation=(X=0.0, Y=0.0, Z=-50.0)
CastShadow=false
bCastDynamicShadow=false
bAcceptsLights=true
bForceDirectLightMap=true
LightingChannels=(BSP=true,Dynamic=true,Static=true,CompositeDynamic=true)
LightEnvironment=HealthFountainLightEnvironment
End Object
Components.Add(BaseMesh)


The next component that HealthFountain needs is the ParticleSystemComponent. This is obviously responsible for emitting particles. Before we create the component in DefaultProperties let's first add an instance variable at the top of the class definition:


var ParticleSystemComponent ParticleEffect;


You might remember that we wanted the number of particles to be getting lower depending on how many health points the HealthFountain had left. This variable will make it possible to pass values into the particle emitter at runtime to achieve that effect. So let’s look at the creation of ParticleSystemComponent in the DefaultProperties:


Begin Object Class=ParticleSystemComponent Name=ParticleSystemComponent0
Template=ParticleSystem'HealthFountain.Effects.P_HF_Whirl'
bAutoActivate=true
Translation=(X=0.0, Y=0.0, Z=-35.0)
End Object
ParticleEffect=ParticleSystemComponent0
Components.Add(ParticleSystemComponent0)


Template is where we can specify which ParticleSystem to use. Again notice the package and actual asset name. There is no need to type those paths manually, you can use Generic Browser to help a bit. With the asset selected in Generic Browser, right click and choose 'Copy Full Name to Clipboard' and then simply paste it in your code. The particle system will also auto start when the instance of our class is created. Again we need to do a translation operation to position this emitter slightly above the base static mesh. Finally, initialise instance variable ParticleEffect with this new ParticleSystemComponent and add it to actor components.

The ParticleSystem'HealthFountain.Effects.P_HF_Whirl' is a particle system I created for the purpose of this actor. So let’s have a quick look how this is set up. I won’t go into details of Unreal Cascade, but as usual I highly recommend learning more about it. You can watch 3DBuzz Unreal Cascade videos here.

The effect I tried to achieve was to have particles spinning around the Z axis with different offsets from it. I also wanted some particles to actually change their offset during their lifetime. There is a module for that called Orbit, and as the name suggests it can make the particles orbit around a certain point or axis in 3D space. In order to get the particles to change their orbiting offsets over time two things need to happen. First we need to set the Offset Distribution to Constant Curve and create several points (key frames) in the Curve Editor. In the Curve Editor we can set how the Offset values (OutVal) will change over particle lifetime (InVal). Once this is done, in the Offest Options we need to set 'Process During Spawn' to unchecked and 'Process During Update' to checked. This will make the Offset values change over time, as opposed to being assigned at particle spawn time. By default only 'Process During Spawn' is checked, turning Offset animations off and making the particle remain the same Offset value over its entire life.


Apart from Orbit module, there are also other modules applied to the 4 emitters in this Particle System. 'Size By Life' makes particles smaller towards the end of their life time, 'Acceleration Over Life' changes their velocity and Rotation modules set how the particles rotate around their own center. 'Color Over Life' changes particle brightness with time. Notice that in order to be able to change 'Color Over Life' in Cascade, the material needs to have a 'Vertex Color' material node affecting the color. In my case I used Material 'Envy_Effects.Tests.Materials.M_EFX_Particles_Flare01'.

Spawn module is where we can control how many particles should be spawned. In order to be able to change that number by code at runtime we need to set 'Spawn Rate Distribution' to DistributionFloatParticleParameter.

'Parameter Name' specifies the name of the parameter used to pass the value in UnrealScript or Kismet into this emitter.


'Min Input' and 'Max Input' define the range of values passed into the parameter. 'Min Output' and 'Max Output' specify the range of values for the 'Spawn Rate'. The Input and Output values are mapped (when 'Param Mode' is set to DPM_Normal), so for example if 'Min Input' is 0.0 and 'Max Input' is 1.0 and the 'Min Output' is 0.0 and 'Max Output' is 10.0, a parameter value of 0.5 will spawn the 50% value between 0.0 and 10.0. You can check that in Cascade by changing the Constant value. The Constant value will be used as the default value if no parameter value will be passed into the particle system through Kismet or UnrealScript at game time. For this reason let’s leave that at maximum, which in this case is 1.0, to see the HealthFountain full of particles. Each emitter in this particle system has the 'Spawn Rate Distribution' set to DistributionFloatParticleParameter and uses SpawnRateParameter as the 'Parameter Name'. This allows to control 4 emitter spawn rates with one single parameter, mapped differently. For example one emitter could have the 'Min Output' and 'Max Output' set to 0.0 and 10.0, while the other to 0.0 and 50.0.

Back in the DefaultProperties we can add one more component. An ambient sound that will play the Jump Pad sound in a loop (this SoundCue asset is set to looped):


Begin Object Class=AudioComponent Name=AmbientSound
SoundCue=SoundCue'A_Gameplay.JumpPad.JumpPad_Ambient01Cue'
bAutoPlay=true
bUseOwnerLocation=true
bShouldRemainActiveIfDropped=true
bStopWhenOwnerDestroyed=true
End Object
Components.Add(AmbientSound)


At this point the HealthFountain class has all the actor components we need. Next time we will add the code responsible for the actor's behaviour during gameplay.

Below is the entire code of HealthFountain class so far:


class HealthFountain extends Actor
ClassGroup(Custom)
placeable;

/** Health points stored by this instance */
var() int HealthPoints;

/** How much health points are regenerated */
var() int HealingAmount;


var ParticleSystemComponent ParticleEffect;


DefaultProperties
{
Begin Object Class=DynamicLightEnvironmentComponent Name=HealthFountainLightEnvironment
bEnabled=true
bDynamic=false
bCastShadows=false
End Object
Components.Add(HealthFountainLightEnvironment)

Begin Object Class=CylinderComponent Name=CollisionCylinder
CollisionRadius=32.0
CollisionHeight=50.000000
CollideActors=true
End Object
Components.Add(CollisionCylinder)
CollisionComponent=CollisionCylinder
bCollideActors=true

Begin Object Class=StaticMeshComponent Name=BaseMesh
StaticMesh=StaticMesh'Pickups.Base_Powerup.Mesh.S_Pickups_Base_Powerup01'
CollideActors=false
Translation=(X=0.0, Y=0.0, Z=-50.0)
CastShadow=false
bCastDynamicShadow=false
bAcceptsLights=true
bForceDirectLightMap=true
LightingChannels=(BSP=true,Dynamic=false,Static=true,CompositeDynamic=true)
LightEnvironment=HealthFountainLightEnvironment
End Object
Components.Add(BaseMesh)

Begin Object Class=ParticleSystemComponent Name=ParticleSystemComponent0
Template=ParticleSystem'HealthFountain.Effects.P_HF_Whirl'
bAutoActivate=true
Translation=(X=0.0, Y=0.0, Z=-35.0)
End Object
ParticleEffect=ParticleSystemComponent0
Components.Add(ParticleSystemComponent0)

Begin Object Class=AudioComponent Name=AmbientSound
SoundCue=SoundCue'A_Gameplay.JumpPad.JumpPad_Ambient01Cue'
bAutoPlay=true
bUseOwnerLocation=true
bShouldRemainActiveIfDropped=true
bStopWhenOwnerDestroyed=true
End Object
Components.Add(AmbientSound)

HealthPoints=100

HealingAmount=5
}

Thursday, 5 May 2011

Creating a custom actor part 2/4

If you are familiar with object oriented programming, you should be able to get up to speed with UnrealScript easily. UnrealScript is similar to Java, but it has many unique features that are more suited towards game programming. I highly recommend reading the UnrealScript Reference page at UDN to get a glimpse into its features. Apart from the official docs at UDN, it is also worth looking at source code delivered with UDK. After all, it contains a lot of example classes from an actual game, so why not do that?

To get started you will need to set up your development environment. I won’t go into details on how to set it up, but instead I will share useful links to other websites that explain this process.

nFringe by Pixel Mine is a great tool to use with Visual Studio. You can find a simple set up guide here.

When you have the tools installed you can follow this guide to configure the development environment.

Now it is time to finally create the first UnrealScript class and look closer at what it is made of. In UnrealScript you can only have one class definition in a file. Let’s create a file called HealthFountain.uc and add the following code to it:


class HealthFountain extends Actor;

DefaultProperties
{
}


This is a very basic class definition. At this point the HealthFountain class does nothing more than the base Actor class from which it is derived. By extending the Actor class, the HealthFountain class has all the properties and functions of the Actor class. You can look into the Actor.uc file to see all the code in the Actor class.

Notice the DefaultProperties block that follows class declaration. In this block you can initialise class variables to their default values and add Actor components.

Let’s add more code to the HealthFountain class and make the actor visible in the level.


class HealthFountain extends Actor
ClassGroup(Custom)
placeable;

/** Health points stored by this instance */
var() int HealthPoints;

/** How much health points are regenerated */
var() int HealingAmount;

DefaultProperties
{
Begin Object Class=StaticMeshComponent Name=BaseMesh
StaticMesh=StaticMesh'Pickups.Base_Powerup.Mesh.S_Pickups_Base_Powerup01'
End Object
Components.Add(BaseMesh)

HealthPoints=100

HealingAmount=5
}


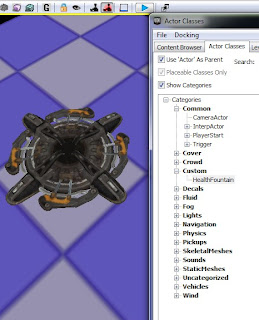
The keyword placeable allows the class instance to be placed in the level by the level designer. The ClassGroup allows to specify the category in which this actor will be listed in the Actor Classes window of the Generic Browser. If we don’t specify that, the actor will be listed as Uncategorized. We can use the keyword notplaceable when we want to disable actor placement in the level. For example think of a base actor AmmoPickup that would not be placeable, but its more specific subclasses like PistolAmmoPickup or RifleAmmoPickup would be placeable.


You will notice that we also added some variables to the class. In UnrealScript there are two kinds of variables and they have some specific rules to follow when using them.

Instance variables (keyword var) are the variables specific to a class instance. They must be declared right after class declaration or within struct declarations.

Local variables (keyword local) are used within functions and they are only active while that function is executing. They must be declared as soon as the function code starts. Also they cannot be initialised in the same line as their declaration. An example of that will be shown in later posts.

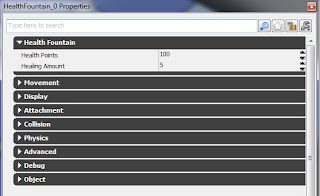
Instance variables can also be exposed in Unreal Editor when we use var() keyword. So in the case of HealthFountain class above, the level designer will be able to change two integer values called HealthPoints and HealingAmount when they open the actor properties window (F4 in the editor).


Next we have some more code in the DefaultProperties block. First thing that happens in the DefaultProperties block is a creation of a StaticMeshComponent (one of many types of Actor components, more on that at UDN). The new StaticMeshComponent is told to use the StaticMesh'Pickups.Base_Powerup.Mesh.S_Pickups_Base_Powerup01' pickup base as a static mesh. Notice the way you need to specify the full package and asset name. When the component is created, we then add it to the actor component array of our actor.

After that we set the HealthPoints and HealingAmount to default values. This will mean that each time an instance of this actor is placed the level, it will have those values as default. These values can be changed by level designer, because we exposed them in the editor by using var() keyword.

At this point the HealthFountain actor has its most basic code done. It appears in the Actor Classes window of the Generic Browser and can be placed in the level. Right now it only looks like a static mesh, and of course does not have any of the features discussed previously. We will add more Actor components and functionality to our custom actor in the next post.

Monday, 2 May 2011

Creating a custom actor part 1/4

Before we jump into coding our custom actor in UnrealScript, it would be good to know what we are trying to achieve. Actors are basically all gameplay and level elements that can be placed in a level. Think of static meshes, weapons, pickups, players etc. The image below presents the basic look of our custom actor that we will create.


So what do we have here? As you can see in the image, our actor consists of a mesh (standard UT pickup base), particle emitter and collision component (you can press C key in Unreal Editor to view collision). Later on you will find out that this actor also has a sound component, so that it can play sounds in the level.

In Unreal Engine there are of course more Actor components than that. You can learn more about Actor components at UDN. Actor components are basically modules that add certain functionality to the base Actor class. Instead of keeping all the code and functionality in one class, you can simply decide which components you want your specific actor to have.

Ok, so what exactly is this actor here? Well, I called it a HealthFountain.

Imagine a safe spot in your level, where the player can slow down for a moment, take a break from beating all the bad guys and regenerate their health. This is where the HealthFountain comes in. The player can simply enter the fountain and restore health points (unless your game uses automatically regenerating health and armour, then this is pretty much useless). Stepping out of the fountain will stop the regeneration process. Also if player’s health was restored to the maximum, the fountain will stop healing the player. The HealthFountain has a health points limit though and once the health points run out, the fountain will be empty and disabled. How do we know that the fountain is running out of health points? Well, the amount of particles will let us know. The fewer health points are left in the fountain, the fewer particles will be emitted.

I made an example video showing how this is going to work.


In the next post we will jump into coding our custom actor using UnrealScript.